
To clean a cocktail shaker that is stuck, release the seal gently before washing the separated parts with warm water, mild dish soap, and a soft brush. Let an ice-cold shaker return toward room temperature first; do not pry the joint, apply direct heat, or force a glass-and-metal shaker apart.
TL;DR
How to clean a cocktail shaker that is stuck: release the seal, wash every part, and dry separately.
Boston shakers need careful seal release; cobbler shakers also need attention around the cap and strainer holes.
Never use boiling water, knives, or hard impacts to separate a stuck shaker.
Quality Barware suits home bar enthusiasts who want cocktail tools chosen by a working bartender.
Why this matters
A stuck shaker creates two jobs: opening it without damage and cleaning the surfaces hidden inside the joint. Washing the outside does not remove dried syrup, citrus pulp, or residue trapped between overlapping parts.
For your 2026 home bar, the useful buying standard is simple: choose tools you can open, inspect, and wash. Quality Barware sells cocktail glasses and home bar essentials curated by a working bartender, with practical advice rather than selection from a wholesale spec sheet. That helps you choose a tool; careful cleaning still depends on how you use it.
How do you clean a cocktail shaker that's stuck together?
Open the joint first, then clean every separated component. Start with the least forceful method, and stop if you find cracked glass, a distorted rim, or a damaged joint.
Clear the work area. Stand over a towel-covered counter, not a hard sink edge. Keep your face away from the opening and your hands away from any chipped glass.
Remove anything that opens easily. On a cobbler shaker, try removing the small cap without forcing it. If it opens, empty the contents through the strainer before working on the larger joint.
Let the cold ease. If the shaker has just held ice, leave it upright until it is no longer intensely cold. Do not put a fully sealed shaker in hot water or heat it on a stove.
Improve your grip. Dry the exterior and use a clean rubber grip or dry dish towel. Grip the actual components rather than pulling on a small knob or thin rim.
Release the appropriate joint. Use the shaker-specific method below. Gentle movement is the goal; more force is not the next step when something feels wrong.
Wash, rinse, and inspect. Once open, empty the contents, wash each part separately, and check the rims and seams before drying everything apart.
If a shaker remains locked after gentle attempts, stop. A stuck tool is replaceable; a hand injury from broken glass is not an acceptable cleaning method.
Match the method to the shaker
Identify the construction before attempting to separate anything. A Boston shaker uses 2 vessels, while a cobbler shaker typically has 3 parts: the body, strainer lid, and cap.
All-metal Boston
Best for: Home bartenders comfortable using a separate strainer
Useful feature: Both vessels separate for cleaning
Real drawback: The overlapping tins can form a tight seal
Opening approach: Let the cold ease, then release the side of the seal with controlled hand pressure
Glass-and-metal Boston
Best for: Users who prefer a visible mixing vessel
Useful feature: You can see the contents through the glass
Real drawback: Glass can chip or crack under force or temperature shock
Opening approach: Return toward room temperature; avoid impacts and abrupt temperature changes
Cobbler
Best for: Home bartenders who want a built-in strainer
Useful feature: The strainer is part of the lid
Real drawback: The cap, lid seam, and strainer holes all need cleaning
Opening approach: Remove the cap if possible, then gently work the larger lid joint
These are construction differences, not a 2026 product ranking. Choose by handling and cleaning needs, not appearance alone.
All-metal Boston shaker: release the seal, not the rim
An all-metal Boston shaker consists of 2 overlapping tins. After shaking, the angled fit and cold metal can make that joint difficult to release.
Set the shaker upright and let the cold ease before trying again. Hold the larger tin securely near the joint, keeping your grip away from sharp edges. A controlled tap with the heel of your other hand against the side of the outer tin near the seal is a standard way to break a Boston shaker seal; it is not a blow against the rim or base.
Use a towel for grip, not as permission to strike harder. Once the joint loosens, separate the tins and empty them before washing.
If dried cocktail residue is visible around an accessible seam, wipe it with a warm, damp cloth. Do not insert a blade, screwdriver, or spoon handle between the tins. Prying can distort the rim and leave the shaker harder to seal or open afterward.
Glass-and-metal Boston shaker: protect the glass
A glass-and-metal Boston shaker needs a more cautious approach because the glass is breakable. Do not strike the glass, bang the assembly on a counter, or pour hot water over a chilled glass vessel.
Let the assembly return toward room temperature on a stable surface. Dry both exposed surfaces, grip them with a towel, and try gentle movement without bending the glass sideways against the metal rim.
Stop if the glass shows a chip, crack, or damaged edge. Do not keep using damaged glass, even if the shaker eventually opens.
For your 2026 cleaning routine, make this the firm distinction: an opening technique intended for metal tins is not permission to hit a glass-and-metal assembly. If you cannot separate it with controlled handling, leave force out of the process and seek the manufacturer's guidance.
Cobbler shaker: clean the cap and lid separately
A cobbler shaker typically has 3 parts, and either the small cap or the larger strainer lid can stick. Identify which joint is resisting before pulling on the whole assembly.
Try the small cap first, using a dry grip and gentle movement. If it comes off, drain the shaker through the strainer and let the assembly return toward room temperature before working on the lid.
Once the shaker is open and empty, warm soapy water helps loosen sugary residue around accessible joints. Use a soft brush around the cap's inside edge and the lid's overlap; these are easy places to miss when you wash only the visible bowl of the shaker.
A built-in strainer saves you a separate tool during pouring, but it creates another cleaning surface. Hold the lid toward a light after washing so you can check that pulp is not still blocking the holes.
Wash the separated shaker thoroughly
Opening a shaker is not the end of cleaning it. Syrup can remain under a rolled edge, and citrus pulp can cling to a strainer after the main body looks clean.
Use this sequence once every component is accessible:
Empty residue. Remove spent ice, fruit, herbs, and other solids before washing.
Wash gently. Use warm water, mild dish soap, and a soft sponge or brush. Follow the manufacturer's care instructions for coatings, finishes, and removable seals.
Clean the seams. Work around the overlapping rims and the underside of any strainer lid. Use a small soft brush where a sponge cannot reach.
Rinse completely. Rinse the interior, exterior, and joints until no soap or loosened debris remains.
Dry separately. Leave the components apart until the interiors and overlapping surfaces are dry.
Avoid steel wool and harsh abrasive pads. Scratching a finish does not make the tool cleaner, and aggressive scrubbing is not a substitute for reaching the actual seam.
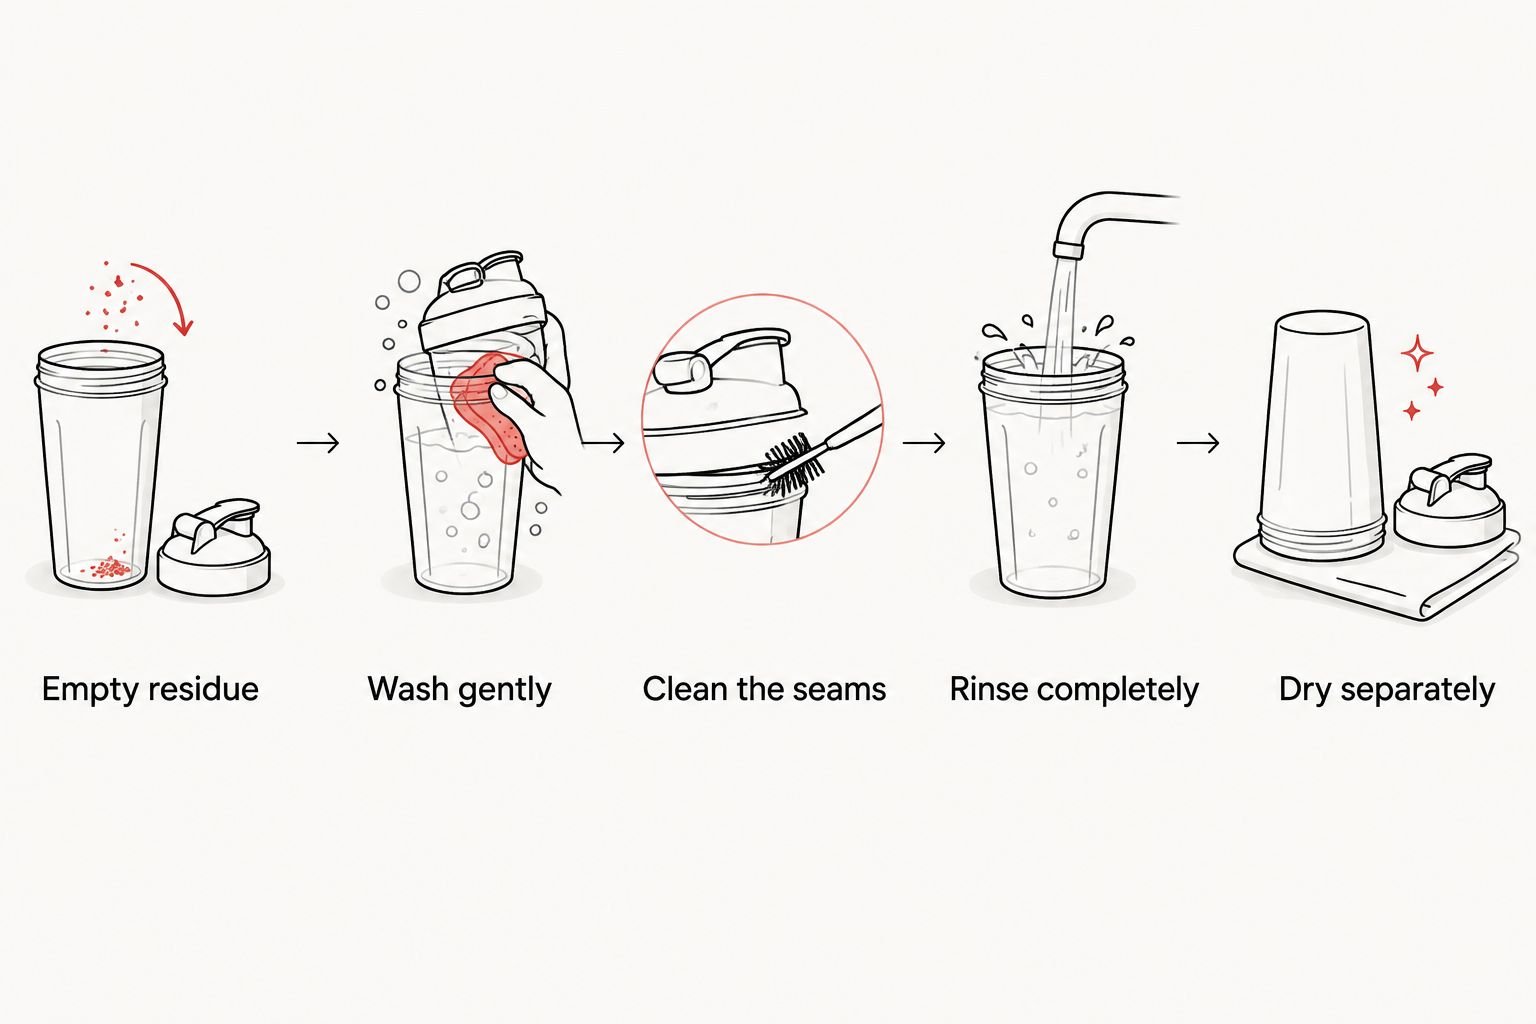
The overlapping surfaces need cleaning and drying just as much as the main vessel.
Check the dry parts before reassembly. Run a fingertip carefully over intact metal surfaces to find remaining tackiness, but do not feel along chipped glass or a visibly damaged edge. If a joint still feels sticky, wash it again rather than forcing it closed.
Why cocktail shakers get stuck
A tight shaker is not always a dirty shaker. Use the circumstances to choose your next move instead of treating every jam as a reason to pull harder.
Cold and a tight seal. Shaking with ice chills the assembly. Letting it return toward room temperature is a safer first step than applying heat.
Dried sugar. Syrup, liqueur, and sweetened mixers leave residue when they dry. Clean the overlapping surfaces after use.
Trapped solids. Citrus pulp and herbs can collect around strainer holes and lid edges. Inspect those areas separately.
A deeply seated joint. Driving parts together harder than necessary makes separation more difficult. Seat the shaker securely without excessive force.
Damaged mating surfaces. A dented tin or distorted rim changes how the parts fit. Inspect recurring trouble rather than repeating the same forceful opening attempt.
For a 2026 bar-tool refresh, repeated jamming is a reason to inspect the fit before buying more accessories. A new strainer will not repair a distorted shaker rim.
Can you put a stuck cocktail shaker in the dishwasher?
Do not use a dishwasher to try to open a stuck cocktail shaker. The hidden surfaces between assembled parts remain difficult to clean, and dishwasher compatibility depends on the specific shaker and finish.
Separate the shaker first. Then follow its manufacturer's instructions for machine washing; without those instructions, hand washing is the practical default. Remove and clean any removable seals only as directed, rather than pulling apart components not intended for disassembly.
Why does a clean cocktail shaker stick again after drying?
A clean shaker can stick again because the parts fit tightly, the rims are distorted, or the assembly was put away before the overlapping surfaces dried. Cleaning removes residue; it does not repair a damaged joint.
Store the parts separately or loosely nested so they lift apart without effort. Before your next use, inspect the contact surfaces and assemble the shaker with controlled pressure rather than driving the pieces together.
If you are choosing a replacement, ask about the opening method as well as the shape. Quality Barware's bartender-curated approach is relevant here: practical handling advice matters when you are deciding which tool suits your home routine. No shaker design removes the need to clean its joints.
FAQ
What's the safest first step when my cocktail shaker won't open?
Let an ice-cold cocktail shaker return toward room temperature, then dry the outside for a secure grip. Keep it upright and avoid prying, direct heat, or hard impacts.
Can I pour boiling water over a stuck cocktail shaker?
Do not pour boiling water over a stuck cocktail shaker. It creates a burn risk, can damage finishes, and is especially unsuitable for chilled glass because of temperature shock.
How do I remove dried syrup from a cocktail shaker lid?
Remove dried syrup from an accessible shaker lid with warm water, mild dish soap, and a soft brush. Separate the parts first whenever possible, then clean both sides of the overlapping seam.
Is it safe to tap a shaker against the kitchen counter?
Do not bang a shaker against the kitchen counter to open it. Hard impacts can dent metal or break glass; use controlled handling appropriate to the shaker's construction.
Should I store my cocktail shaker fully assembled?
Store your cocktail shaker with its parts separate or loosely nested after they are fully dry. Tight reassembly makes the next opening harder and hides any moisture or residue left in the joint.
When should I stop trying to open a stuck shaker?
Stop when you see cracked or chipped glass, a distorted rim, or when opening requires escalating force. Seek manufacturer guidance rather than using a knife, pliers, or a hammer.
One last thing
Check the fit while the shaker is clean, dry, and at room temperature. If it still catches before you add ice or ingredients, colder cocktails and different washing habits will not fix that mechanical problem.
Make that your 2026 maintenance check before the next round. Quality Barware's working-bartender curation is useful when choosing home bar tools, but the most useful habit costs no extra equipment: inspect the joint before forcing it shut again.